background

Wednesday, August 29, 2012

Bridal Shower "L" Cookies

 
 lemon butter cookies

For the bridal shower I also made scalloped circle cookies with a cursive "L" on them for the bride-to-be. I used a lemon butter cookie recipe from a "Southern Living" magazine my co-worker reads.  She saw these really cute valentine cookies in the magazine (a while ago) and brought the magazine in for me because she immediately thought of me when she saw them. It was really sweet of her...so I just had to try out the recipe and give her some.  Now I've saved the recipe and use it when I want to change things up from my usual shortbread cookie recipe. I thought these would be perfect for the bridal shower because they'd go with the lemon cupcakes.

Since the shower colors were green and white, I colored most of the royal icing green and left a little white for the letters and decorative dots.  I piped green circles about 1/4" from the edge of the cookie to create a dam for the green base. Once the dams set, I filled it with the green icing. While those were drying I worked on piping the "L" letters. I used the same technique as the spring flower cookies and created a template (trying my best to make a nice cursive "L"), cut out 1.5" squares of wax paper piped the "L" onto them with the template showing through under the wax paper. This helped me make them more uniform. Once the green base and the "L" letters dried, I used a little white icing to place the "L" letters onto each cookie. Then to add that extra decorative touch, I piped little dots around the green base. 

I loved the look of these cookies...so simple, yet elegant.   

Lemon Butter Cookie Recipe:

1c          butter, softened
1 tsp.     lemon zest
1c          powdered sugar
2c          all-purpose flour
1/2 tsp.  salt

Preheat oven to 325F. Beat butter and zest until creamy. Gradually add sugar, beat well. Combine flour and salt; gradually add to butter and sugar mixture, beating until blended. Shape dough into a disc. Roll dough to 1/8" thickness on a lightly floured surface. Cut into desired shapes with cookie cutter(s); place 1/2" apart on parchment paper lined cookie sheet. Bake for 12-14 minutes or until edges are lightly golden. Cool on racks and decorate!

Thursday, August 23, 2012

Lemon Cupcakes


lemon cupcakes

A couple of weeks ago my friend asked me to make desserts for a bridal shower she was throwing for her sister. It was my first "catering job"...not counting my family's parties that are like a catering job in itself with 50+ people!

She was really open to whatever I felt like making but did request the chocolate mint macarons I make. I originally thought to make the ombre cake (like the one I made for fourth of July but with shades of green and white) but decided on cupcakes instead. This way she wouldn't have to bother with cutting and serving the cake.

The shower colors were green and white, so I found green cupcake liners and kept it simple with white buttercream frosting.  I found this super simple lemon cupcake recipe that I used...tried it out the week before the shower and it was husband approved. For the vanilla buttercream frosting I used an Ateco 866 tip. I bought this tip a while ago and have been wanting to try it out for some time now.  I honestly don't make cupcakes much and took the opportunity to try this tip out...and I loved it!  They look like little flowers on the top of the cupcake.  You just pipe the buttercream holding the tip just above the center of the cupcake and let the buttercream push out of the tip onto the cupcake.  Then you tap the bottom of the cupcake on the counter or the palm of your hand to get the buttercream to spread out more. The only difficult part it getting the buttercream to pipe out even so the middle is nice and centered onto the cupcake. At the decorate shop I found clear plastic cupcake containers just like you would find at the store. They were perfect for my first catering job...so 'professional'...well, I try. 

Saturday, August 11, 2012

Panna Cotta with Berries


panna cotta shots

I found (well actually my husband spotted them) the cutest little shot glasses at Crate & Barrel and I just couldn't wait to use them. My family came over for dinner a couple of weeks ago and thought I'd take the opportunity to use these for a nice little dessert.  My mom is not huge on dessert...she just needs a couple of bites of something mildly sweet and she's good...but I know she loves berries.  I found some lovely berries at a fruit stand by our house and decided I'd make panna cotta with berries.  I've been eyeing this panna cotta recipe from Ina Garten for a while and thought this would be a perfect dessert. I ended up using low fat plain yogurt verses whole-milk yogurt and forgot to buy the vanilla beans but overall it was pretty good. 

Next time I'll definitely follow the recipe exactly and see how it makes a difference.  I also just sprinkled some sugar on the strawberries to sweeten them up and create a little glaze for the berries.  I topped the panna cotta with a marionberry, sliced strawberries and blueberries. I loved the look of this dessert and found it's perfect when all you want is a few bites of something creamy and midly sweet.  

Sunday, July 8, 2012

Grasshopper Mint Macarons


chocolate mint macarons

My friend asked me to make macarons for her sister's bridal shower and the colors are green and white. I've been wanting to try and make grasshopper mint macarons for a awhile...had full intentions of making them for St. Patty's Day and drawing little clovers on them but didn't get around to it...so I thought this would be a great opportunity to try it out.  

Using the french macaron recipe I always use (see my other macaron posts), I colored the batter green (using Wilton's moss green gel color). They came out a little lighter than I had hoped, the color per the bridal shower invitation is a bit darker, so I'll have to make note of that for the actual shower macarons.

Once I baked up the cookies I let them cool and then worked on the filling.  I actually had to make another batch because my first batch didn't turn out. I thought I could just add half of the beaten egg whites to the batter first, then add my coloring, and then fold in the rest of the egg whites, so that I could get the color right without over-mixing it.  It ending up just clumping up and not mixing well at all. That was pretty frustrating...live and learn.

For the filling I found a bag of Andes baking bits and made a ganache (using 1 cup of mint chocolate bits and 1/4 heated heavy cream).  I let the ganache cool a bit and put it in a piping bag to make it easy to fill the macarons.

Overall, the macarons turned out pretty good. Just need to work on my technique to get more consistency in making them.

Wednesday, July 4, 2012

Happy 4th of July!

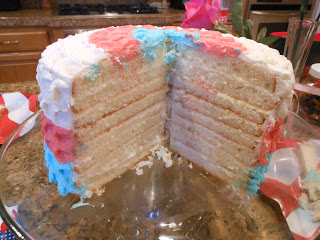
 lemon chiffon petal cake
 crumb layer
red, white & blue frosting

8 layers!

I've been dying to try this petal decorating style on a cake ever since I saw it on the i-heart-baking blog. So, for 4the of July I decided to make a lemon chiffon cake and decorate it "petal-style" with red, white and blue frosting. I found this lemon chiffon cake recipe online a couple of years ago and it's so light and yummy.

First I made the cake (four 8" round cakes) and cut each cake in half to create 8 layers. I used a cream cheese whipped cream frosting and put a thin layer of frosting between each layer. Then I put a thin layer of frosting over the entire cake to create the crumb layer. I put the crumb layered cake in the fridge while I separated out the frosting, colored the red and blue and put them into piping bags. Then it was time for the fun part...decorating!

To make the petals you pipe dots in a single column and then smear the dot from the center. Here's a great tutorial on how it's done. This process does take some time but my husband helped me speed up the process. I piped and he smeared. We found that once you've established the first few columns, it is faster to do the entire row(s) of the one color at time, instead of going down each column. This makes it much easier because you don't have to take as much time cleaning off the spreader used to smear the dots (minimizing color contamination).

Overall the cake turned out really well. I do need to work on the spacing between petals and I think next time I'll use a buttercream frosting for the petals instead of a whipped cream based frosting.  This should make it look a little more clean...but I just love whipped cream! So, it might look better with the buttercream but I'm not sure if it'll taste as good.

Hope you all had a wonderful 4th of July!

Saturday, June 30, 2012

S'mores bites


 s'mores bites


For the Fourth of July, I found the cutest red, white and blue goodies that I just had to get for my little niece and nephew. I found the blue and red pails and sunglasses from Target (gotta love that $1 section) and mini pinwheels from Michael's (gotta take advantage of those 40% off coupons). I also got one of those $10 coupons from Kohl's and found the cutest little red, white and blue baby doll top for my niece and plaid shorts for my nephew (sorry they're rolled up in the pails so you can't see them). And of course as an added personal touch I had to bake a little something for them!...even though they're not even 2 yet and can't eat the treats I make...my sisters and brother-in-laws can enjoy them.

For the s'mores bites I used this s'mores bars recipe I found from the "Hostess with the Mostess" blog. Since the pails were so small I didn't think the bars would fit well, so I decided to try to make them bite size. For the bites I took the graham cracker crust and pressed it into a mini muffin pan. I baked it for about 7-8 minutes until it was slightly golden brown. Then I melted the chocolate (I used candy coating from Fred Meyer's because that's what I had on hand and I wanted to use it since it's been in my pantry a while). Next time I think I'd prefer dark chocolate, but this was definitely the classic s'mores with milk chocolate. After spooning the chocolate on I placed a marshmallow star on top. I found the red (more like pink), white and blue marshmallows at Walmart. They come in varying sizes too. After I put a marshmallow on each s'more bite I put it in the fridge to let the chocolate set. Since I was in a little bit of a rush to get these packaged, I just put it in the fridge for about 5 minutes. Then, I put it under the broiler for 1-2 minutes and kept a close watch on them, until they were nicely browned. After that I put it back in the fridge for 5-10 mins to make it easier to pop them out.

These were really simple and added that little touch to make their little Fourth of July packages extra special. Maybe next year they'll be old enough to really enjoy them. 

Happy 4th!


Tuesday, April 24, 2012

Spring Flower Cookies

 spring flower cookies

Spring has finally arrived! Last weekend we had such beautiful weather and what better way to add some sunshine inside than making a colorful platter of flower shortbread cookies! Ok, I did get outside and enjoy the sunshine too...

For the cookies, I used the same dough as the Easter cookies (this shortbread cookie recipe from sweetopia). I also got the inspiration for this cookie from sweetopia. On the blog she made daisy cookies in which she made royal icing transfers.

First I made a template for my flower on a piece of wax paper, using edible marker, but looking back at it I could have just as easily drew it on a piece of paper and used a regular pen. I then suran wrapped over it to make it stay on the counter. I usually suran wrap my counter top to make a nice clean surface for me to work on...and it makes it so easy to clean up. Gotta love that costco suran wrap...it's practically endless!
Once I had my template. I cut out squares of wax paper for each flower and wiped some shortening on them so the flowers would easily come off. The wax paper is kind of opaque so the template shows thru nicely. I then piped the flowers on each piece of wax paper using pink, yellow, lavender and green royal icing. While the flowers were still wet I put a pearl sprinkle in the center of each one.
While the flowers were drying I piped a circle on the fluted circle cookies, leaving about a 1/8" border and filled with with white icing. Once the white set a little, I piped little dots with the correponding flower colors around the white circle to add a decorative touch. Then it was the moment of truth...I carefully peeled the flowers off the wax paper, piped a little icing on the back and adhered it to the center of the cookie.
With all the cookies together it looked like spring! It was so much fun making these and I really liked this technique of making icing transfers. Thanks again sweetopia!